
SIEGE BRAKE 9MM – LONG
(SB3-9MM)
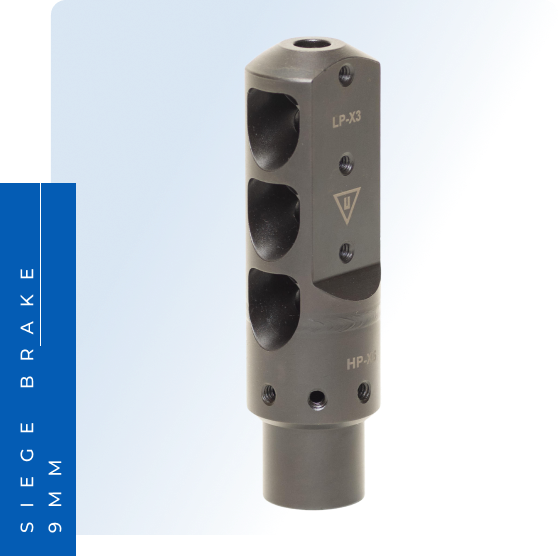
SIEGE BRAKE 9MM – LONG (SB3-9MM)
- Always ensure firearm is unloaded before installation.
- Work should only be done by a qualified gunsmith.
Installation
- SB-9MM can be installed with included crush washer. The “pointed” side of the washer should face rearwards. Once snug tighten until the rear most "top" port is facing directly upwards.
- Use a drill bit SPINNING IN REVERSE/ COUNTER CLOCKWISE to clean out tuning ports. If you have already tuned the brake use the same size bit that you drilled each port out with.
- Ensure that the brake is aligned with bore of the barrel using a precision bore guide rod. This is a precaution as we’ve seen some barrels with non-concentric threads, although most are within tolerance.
Cleaning
- It is recommended to purchase the Unrivaled SB-9MM Cleaning and Tuning Kit from www.unrivaledproshop.com for cleaning.
- ALWAYS WEAR EYE PROTECTION WHEN CLEANING
- With heavy use it is normal for carbon and lead to build up on 9mm brakes. This will need to be cleaned periodically to avoid accuracy issues and loss of efficiency.
- We recommend cleaning every 1000-3000 rounds depending on the load. This is something you can easily see and decide when there is heavy enough fowling.
- Use an auto punch (included in Unrivaled kit) or a small punch and hammer to chip away carbon from two primary ports and large top port.
- Use a drill bit SPINNING IN REVERSE/ COUNTER CLOCKWISE to clean out tuning ports. If you have already tuned the brake use the same size bit that you drilled each port out with.
Tuning
- It is recommended to purchase the Unrivaled SB-9MM Cleaning and Tuning Kit from www.unrivaledproshop.com for tuning.
- Ensure that eye protection is worn at all times and ear protection is worn while live firing.
- Use proper live fire safety precautions. Ensure there is no one to the sides or in front of the shooter.
- It is recommended to have other variables, like Buffer system and lifters in bearing delayed setups.
- Tuning of the Siege brake is done by drilling holes into the expansion chamber near the rear of the brake. There are 4 piloted holes that can be drilled accordingly.
- Before drilling it is important to test fire the gun and observe how the recoil is moving the gun.
- We recommend holding the gun neutrally and not applying excessive tension to control muzzle rise. You can fire single shots and watch how your sight moves or fire two rapid shots on a fresh target and note where the second shot is in relation to the first.
- For a right-handed shooter the gun will usually move up and to the right. A left-handed shooter will usually move up and to the left.
- First ensure the gun is unloaded and then start by drilling small holes on the same sides as the recoil movement. This can be done at the range with an electric hand drill
- A 11/64 drill is a good starting point.
- A right-handed shooter would usually drill out a combo of the top right and right side ports.
- Slowly enlarge the holes until the gun returns to the same spot after firing. (The Unrivaled kit includes all needed drill bits.)
- Holes can be drilled to a maximum of 1/4" diameter. This will be enough to counter the recoil of any setup.
- Be careful not to drill the muzzle of your barrel on accident. some barrels protrude farther into the brake than others.